Shooting through the scope is more difficult than piggybacking. I recommend that you begin with piggybacking and as you become proficient, then move to through the scope photography. The most important things for deeps sky photography are a good drive, good polar alignment, and patience at the guiding eyepiece.
You can guide using two methods, an off-axis guider or guide telescope. Using a guidescope is easier. It is usually a long focal length refractor with adjustable rings to move the scope around to find the guide star. The only drawbacks to guide scopes are they often suffer from flexure. That is, if the scope is not securely tightened down, the tube will flex as the exposure occurs. This may be due to weight shifting or other factors. The net result is the guider guides on the flexure and not on what the camera is supposed to be tracking. Now your guiding is imperfect and the stars are not pinpoints. The other method is via off-axis guiding. Here there is a small prism in between the camera and the scope. It is off the edge of the camera field so as not to interfere. It allows you to guide through the same scope that the camera is photographing through. Now flexure will not occur. Off-axis guiders have special designs, which allow them to rotate 360 degrees and thus the operator can select guide stars at any point surrounding the camera field.
The method to start your photograph is in several steps. First, center the object in the field of the scope. Second, select your guide star and position your off-axis guider/guide scope to be set up for the photo. To select the guiding star, start with a low power eyepiece so you can easily locate a good star and then center it. Now you can place your high-power guiding eyepiece in the guider. Then move the scope to the nearest bright star for checking the focus. I have found the best method is to use the Live mode on your camera and zoom in as much as possible. Then you can focus on the star. I then take a test exposure of a few seconds and examine the image closely. If the stars are in focus, you can zoom all the way in with the digital zoom and still see pinpoint images. Make sure you do this every time you move the telescope significantly since the focus may shift. You do not want to see all that work go to waste because the image was slightly out of focus! Lastly, recenter the target. You should not have to adjust the guider. If you do, you may place the scope out of focus. Try and position the scope to center the guide star vice positioning the guider. This method works for me and I am sure most photographers have something similar. Try your own method but be ready to analyze for errors.
After you have centered the object, take some exposures of varying lengths. I like to shoot a minute or two to see if the object is centered. Sometimes, you can not see the actual object and you are using a star field as a guide. After a minute or two, the object should reveal itself. I suggest using a setting of ISO 800 to capture your deep sky objects. Higher speeds introduces too much electronic noise and lower speeds don't quite record the objects as well. As for exposure times, five minutes seems to be adequate. Anything longer just produces too much noise to eliminate and does not add much in the way of signal. Total exposure time for most deep sky objects should be 30-60 minutes. Stacking six, or more, five-minute exposures can capture a lot of detail. I like to use Deepskystacker, which is free and simple to use.
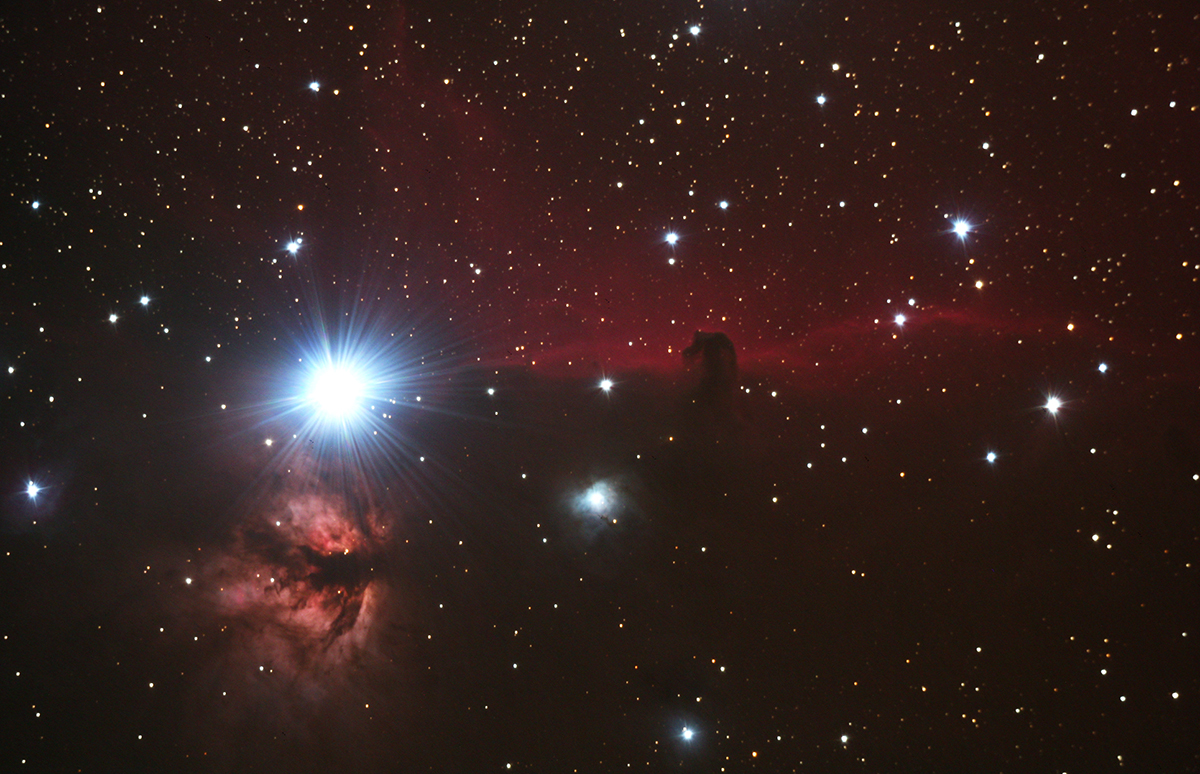
A winter gem for photography is the Horsehead nebula in Orion. Exposure time was a stack of six 5-minute exposures using a modified Rebel T3i at ISO 800. The instrument used was a 6-inch F5 reflector.
Once you have completed the challenge of photographing deep sky objects, you may choose to try photographing the moon and planets. This requires a completely new approach to imaging.objects.
Go to IMAGING PLANETS
Go back to page 1 of ASTROPHOTOGRAPHY GUIDE