My original astrophotography page was designed for film users. Over the past decade since I originally wrote the web page, the information has become outdated. Film is not really used anymore and I rarely use my SLR cameras since I bought two digital SLRs (Nikon D70 and Pentax K110) to replace them. These cameras became obsolete and I know own a Nikon D5000, a Pentax Ksx, and a Canon Rebel T3i (with IR filter replaced). I have also stopped taking pictures of planets with film cameras since the resolution was just too poor. I now use a webcam with some pretty good results. Unfortunately, I am still learning but I wanted to update this series of webpages to reflect what I have learned to date.
Most of us think about it once in a while. If you own any sort of camera, you always want to try and take pictures of the stars to show your friends. Often people ask me how they can take pictures with their telescope. Usually, they own a basic 2.4 inch refractor with an alti-azimuth mount. It is hard for me to say that they will not be able to do much more than photograph the moon with this instrument. Still, there are a lot of things that you can do with a simple camera and tripod. That is why I wrote this page section. I wanted to share with everyone what I have learned for the past five to ten years working with digital cameras. Many of it was through trial and error. Lots of trial and error! I hope that I can eliminate the errors you make and move you from a beginner to an advanced photographer in a short time.
GETTING STARTED-TRIPOD PHOTOGRAPHY
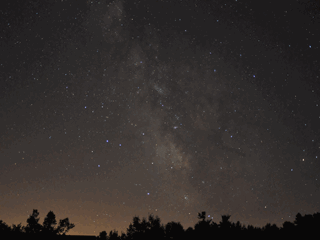
This is the first type of photos that astrophotographers begin with. It is simple. You attach the camera to a tripod, point the camera where you want to shoot, set it to manual mode, set the ISO setting to 400 or above, focus at infinity and set the f-stop wide open. You then trip the shutter with the remote. Many digital SLRs have exposure time settings of 30 seconds or less. These are a great start. Longer exposures will require a "B" (Bulb) setting. Start by taking several exposures. Start with 5 seconds and then double the time on your next shot. Keep doing this until your final exposure is about 5 minutes. Notice how the stars start to "trail" after about 20 seconds of exposure time. As the stars "trail" more, the photograph begins to appear less and less like the sky you see. After about 1 minute (using a 18-50mm lens), the length of the star trails become excessive.
In addition to the stars "trailing", electronic noise will also be recorded. Most digital cameras have a noise reduction feature. Many astrophotographers turn it off and subtract the electronic noise on their own. The more recent grouping of digital SLR's have a low amount of noise. In exposure times less than 30 seconds, noise is not that significant an issue. Try taking 30 second exposures for about 10 minutes. You can then stack the images to produce good old fashion star trails or you can put all the images together to create a "movie" of the sky. This is great for showing the earth's rotation or showing aurorae shifting in the night sky.
A movie of the earth's rotation and the milky way
Tripod shots are severely limited in what can be done with them. However, you can get great shots of foreground objects with stars in the background. The stars rotating around polaris is a popular shot. Some celestial events can be captured on the tripod. Meteor showers, bright comets and planetary conjunctions are some of the most common events.
Go to PIGGYBACKING
Go to DEEP SKY THROUGH THE SCOPE
Go to IMAGING PLANETS
Go to Tim Printy's Astronomy page